Introduction
The API Connector Builder allows the app designer to use a third-party API service based on an OpenAPI Specification OAS document to make the integration easier by configuration through UI. In the builder, an app designer can just upload an OAS document and pick the API endpoints they want to use in app design/integration. Then, the created API connector can be used with the following API connector plugins.
- API Connector Process Tool plugin
- API Connector Form Load plugin
- API Connector Form Store plugin
- API Connector Form Options plugin
- API Connector List Data plugin
- API Connector List Action plugin
Prerequisites
- An OAS document from an API service provider.
- Joget DX 8 Enterprise Edition.
How to install
- Download the plugin JAR file from the Joget Marketplace.
- Go to Settings > Manage Plugins > Upload Plugin.
- Once uploaded, the plugin will be available in your Joget environment.
How to use
API Connector Builder
Once you have installed the API, configure an API connection.
- In a new app or an existing app, navigate to the App Composer.
- Under API Connector Builder, click the ADD NEW button to create a new API connector.

- Provide an ID, Name, and Description for the API connector, and click Save.

- For Select OAS document, upload and select the OAS document.

- Under API Server, for Select API Server, select the API server from the drop-down list.
- Depending on the OAS document used, configure any additional required fields.

- Under Security, for Select Authentication method, select an authentication method provided by the OAS document from the drop-down list.
- Depending on the OAS document selected, configure the fields in the Security section depending on the authentication method selected. The images below display the different fields to configure depending on the OAS document used.


After selecting the OAS document and configuring the authentications, the available API endpoints of the OAS document will be available in the palette. - Click the Design tab.
- In API Connector Builder, drag and drop an API endpoint to the canvas.

- Click the API endpoint on the canvas to configure it.
- After configuring the API endpoint, click Apply Change and click SAVE.
Once an API connector is created, it can now be used in List Builder, Form Builder and
List Builder
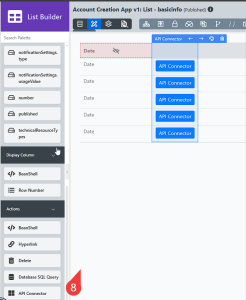
- In List Builder, in the DATA tab, for Select Source of Data, select API Connector from the drop-down list.
- For API Connector, select the API Connector created.
- For Select Operation, select the operation created in API Connector Builder. Depending on the operation type, configure:
- id
- Payload
- For Base JSON Object Name for Multirow Data, configure the name of the base JSON object (e.g., data).
- For Total Record Count JSON Object Name, configure the total number of records in the JSON object (e.g., data.total).
- For Primary Key, configure the Unique Identifier of the JSON object (e.g., data.id). Mandatory field.
- In the DESIGN tab, drag and drop the API Connector to the list or canvas.
- Click the API Connector to configure the following properties:
- Label: Select a display label.
- API Connector: Select the created API connector.
- Select Operation: Select an operation created in the API Connector Builder. Depending on the operation selected, configure:
- id
- Payload
- Click Apply Change and click SAVE.
Form Builder
Settings tab
- In Form Builder, navigate to the Settings tab.
- Under Advanced, for Post Processing Tool, select API Connector from the drop-down list.
- For API Connector, select the API connector created.
- For Form, select the form to store the data to.
- For Select Operation, select the operation created in the API Connector Builder.
- For Base JSON Object Name for Multirow Data, select the name of the base JSON object (e.g., data).
Form Options Data Store
- Click the form element on the canvas to open the Properties tab.
- For Or Load Data Form, select API Connector from the drop-down list.
- For API Connector, select the API connector created.
- For Select Operation, select the operation created in the API Connector Builder.
- Click Apply Change.
Properties Configuration
Operations

POST
Parameters:
- Name: Name of the POST operation
- Description: A description of the POST operation
- Request Body Input Type:
- Payload:
- Request Body
- Input FIelds:
- Field Label
- Default Value
- Mode
- Default
- Force Mandatory
- Hide Field
- Payload:
GET
Parameters:
- Name: Name of the GET operation
- Description: A description of the GET operation
- Field Label: Specify a field label.
- Default Value: Specify a default value.
- Mode:
- Default
- Force Mandatory
- Hide Field
PUT
Parameters:
- Name: Name of the PUT operation
- Description: A description of the PUT operation
- Request Body Input Type:
- Payload:
- Request Body
- Input FIelds:
- Field Label
- Default Value
- Mode:
- Default
- Force Mandatory
- Hide Field
- Payload:
SET
Parameters:
- Name: Name of the SET operation
- Description: A description of the SET operation
- Field Label: Specify a field label.
- Default Value: Specify a default value.
- Mode:
- Default
- Force Mandatory
- Hide Field
Authenticators
oauth2
- Grant Type: Select the method the application uses to obtain an access token.
- Scopes:
- View allowance templates.
- Create and update allowance templates.
- Delete allowance templates.
- Client ID: The Client ID provisioned by the OpenID provider when the client was registered.
- Client Secret: The Client Secret (password) provisioned by the OpenID provider when the client was registered.
- Client Authentication: Select the client authentication type.
- Send as Basic Auth Header
- Send credentials in body
- Headers:
- NAME
- VALUE
openId
- Client ID: The Client ID provisioned by the OpenID provider when the client was registered.
- Client Secret: The Client Secret (password) provisioned by the OpenID provider when the client was registered.
- Code Challenge Method:
- Callback URL: URL to which Auth0 redirects users after they authenticate.
Note
Ensure to provide this Callback URL to your OpenID Connect service.
- Configuration Method:
- OpenID Connect Discovery
- Custom
- Authorization Code:
- OpenID Connect Directory
- Get Authorization Code
- Custom:
- Issuer
- JSON Web Key Set
- Authorization Token Endpoint
- Token Endpoint
- Scopes
- Client Authentication: Select the client authentication type.
- Send as Basic Auth Header
- Send credentials in body
- Headers:
- NAME
- VALUE
Plugin information
The API Connector plugin is part of the Addon Builders suite, designed to help you create, manage, and secure custom APIs within your Joget platform. The available API elements cover a wide range of functionality, from managing users to handling forms and processes.
Download Plugin
You can download the API Connector plugin from the Joget Marketplace.